The Creation of Medieval Manuscripts: From Binding to Writing Support
emiller0718
«
•Page 1
You are here •Page 2 •Page 3 •Page 4 •Page 5 •Page 6 •Page 7 •Page 8 •Page 9 •Page 10 •Page 11 •Page 12 •Page 13 •Page 14 •Page 15 •Page 16 •Page 17 •Page 18 •Page 19 •Page 20 ♦Endnotes »Next page
You are here •Page 2 •Page 3 •Page 4 •Page 5 •Page 6 •Page 7 •Page 8 •Page 9 •Page 10 •Page 11 •Page 12 •Page 13 •Page 14 •Page 15 •Page 16 •Page 17 •Page 18 •Page 19 •Page 20 ♦Endnotes »Next page
24
The creation of a medieval manuscript from writing support to binding is no easy task. Pens and ink had to be made. Lines needed to be added to leaves for orderly copying. Notes had to be left in the margins for rubricators and illustrators. Not even to mention the fact that copying could take years. Nevertheless people were making and copying books. This exhibit will unravel these steps and the many more necessary in the creation of the medieval manuscripts.

|

The Creation of Medieval Manuscripts: From Binding to Writing Support
emiller0718
«Previous page
•Page 1
•Page 2
You are here •Page 3 •Page 4 •Page 5 •Page 6 •Page 7 •Page 8 •Page 9 •Page 10 •Page 11 •Page 12 •Page 13 •Page 14 •Page 15 •Page 16 •Page 17 •Page 18 •Page 19 •Page 20 ♦Endnotes »Next page
You are here •Page 3 •Page 4 •Page 5 •Page 6 •Page 7 •Page 8 •Page 9 •Page 10 •Page 11 •Page 12 •Page 13 •Page 14 •Page 15 •Page 16 •Page 17 •Page 18 •Page 19 •Page 20 ♦Endnotes »Next page
37
Binding
|
|
Much like modern books, medieval manuscripts came in multiple forms, bound and unbound being the most basic distinctions. Graham and Clemens tell us that some “manuscripts were provided with no more than a limp parchment cover” (50). If a book was going to be bond, the binder would have a set procedure to follow. The image on the left is an example of a what a manuscript could come out of the binders looking like.
|

Quires and leaves were bound together with a needle and thread, that is they were sewn together. Each quire would have to be hand stitched on to the sewing support in the correct order. Scribes had multiple tricks to chose from to help make sure the quires weren’t out of order. Roman numerals were sometimes entered into the bottom margin of a first or last page of quire. These numbers, known as quire numerals, would then help the scribe keep the loose quires in order and offer a quick way to return them to their proper order should they be disarranged. Catchwords were another trick scribes would use. Like quire numerals, they too were entered into the bottom margins at the beginning or end of quires. These catch words would match up to the first word on the next leaf of the manuscript. Binders would use the quire numerals or catchwords to check the order of the quires before beginning the sewing process.
|
Example of a Quire Numeral
|
Example of a Catch Word
|

The Creation of Medieval Manuscripts: From Binding to Writing Support
emiller0718
«Previous page
•Page 1
•Page 2
•Page 3
You are here •Page 4 •Page 5 •Page 6 •Page 7 •Page 8 •Page 9 •Page 10 •Page 11 •Page 12 •Page 13 •Page 14 •Page 15 •Page 16 •Page 17 •Page 18 •Page 19 •Page 20 ♦Endnotes »Next page
You are here •Page 4 •Page 5 •Page 6 •Page 7 •Page 8 •Page 9 •Page 10 •Page 11 •Page 12 •Page 13 •Page 14 •Page 15 •Page 16 •Page 17 •Page 18 •Page 19 •Page 20 ♦Endnotes »Next page
36
Binding
|
Once all the quires had been sewn into the sewing support it would be time to add the wooden boards for the front and back covers. The best boards would be created from quarter-sawn wood so they would not warp. The manuscript would be attached to the boards in chiseled out channels using the ends of the sewing support. The inside of the boards would be covered in parchment called pastedown. Leaves used as pastedown weren’t always brand new. Binders would reuse leaves that had been discarded for some reason or another. The outside of the boards would be covered in some sort of tanned animal hide. This leather was sometimes decorated by stamping a design into it. Finished manuscripts might also be given some sort of claps or strap to help keep it closed.
The manuscript to the right is very revealing. Around the edges we can see where the animal skin cover has worn away to reveal the wooden boards beneath and a claps and strap have been added to keep the book closed. |
|
|
|
The image to the left shows the inside of a bound manuscript where a leaf was reused in the paste down. "Such reused leaves are sometimes of great interest to scholars because they may provide significant evidence about otherwise lost manuscripts" (Graham and Clemens 51).
|
The Creation of Medieval Manuscripts: From Binding to Writing Support
emiller0718
«Previous page
•Page 1
•Page 2
•Page 3
•Page 4
You are here •Page 5 •Page 6 •Page 7 •Page 8 •Page 9 •Page 10 •Page 11 •Page 12 •Page 13 •Page 14 •Page 15 •Page 16 •Page 17 •Page 18 •Page 19 •Page 20 ♦Endnotes »Next page
You are here •Page 5 •Page 6 •Page 7 •Page 8 •Page 9 •Page 10 •Page 11 •Page 12 •Page 13 •Page 14 •Page 15 •Page 16 •Page 17 •Page 18 •Page 19 •Page 20 ♦Endnotes »Next page
35
Correcting and Editing
Continuing to go backwards in the manuscript making process, a text needs to be edited and corrected before it can be called complete. Scribes aren’t infallible writing machines. Like us today, they too made errors when writing. Even though they didn’t have a delete or backspace button, scribes had ways to fix their mistakes.
|
|
The easiest way to correct an error was to erase it. This was done by scraping off the mistake with a penknife and re-penning back in the correct letter, word, or phrase. Mistakes corrected in this manner are sometimes easy to see because the new text is not uniform with the rest. If the correction is longer than the erased space, the scribe had to write it in smaller than the surrounding text.
Another way to correct mistakes was to strike out or place dots under the incorrect words. This was to tell the reader to ignore this part of the text. Errors corrected in these manners were usually from eyeskips. Eyeskips occurred when a scribe skipped or repeated letters, words, or phrases, due to close repeated occurrences of those letters, words, or phrases in the text they were copying from. In the image on the left, you can see a smudge in the middle of the page that was most likely caused by erasing a word with a penknife. On the leaf to the right, a correction has been made about a third of the way down by crossing out two worlds with red ink. Another type of error was transposition. If a scribe accidentally invented word order, it could be corrected using superscripted A’s and B’s. They would place an A above the word that was to be read first and a B above the second word. |
|


The Creation of Medieval Manuscripts: From Binding to Writing Support
emiller0718
«Previous page
•Page 1
•Page 2
•Page 3
•Page 4
•Page 5
You are here •Page 6 •Page 7 •Page 8 •Page 9 •Page 10 •Page 11 •Page 12 •Page 13 •Page 14 •Page 15 •Page 16 •Page 17 •Page 18 •Page 19 •Page 20 ♦Endnotes »Next page
You are here •Page 6 •Page 7 •Page 8 •Page 9 •Page 10 •Page 11 •Page 12 •Page 13 •Page 14 •Page 15 •Page 16 •Page 17 •Page 18 •Page 19 •Page 20 ♦Endnotes »Next page
34
Correcting and Editing
|
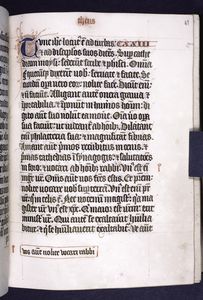
Errors in the text could also be corrected in the margins. Corrections made in this manner are indicated with matching symbols. Before the 10th century the matching symbols would be HD and HS, latin abbreviations meaning look down in the margins or look up in the margins. The matching correction would then marked with either HD or HS depending again on if the correction was above or below the place where the reader should look for its mate. Later these would change into matching signs “They were especially suitable when several corrections occurred on the same page because the reader could swiftly locate in the margin the match” (Graham and Clemens 37).
In the manuscript on the right you can see a key like symbol at the end of a line of text. It matches the symbol next to the correction written in the bottom margin. |
|
The Creation of Medieval Manuscripts: From Binding to Writing Support
emiller0718
«Previous page
•Page 1
•Page 2
•Page 3
•Page 4
•Page 5
•Page 6
You are here •Page 7 •Page 8 •Page 9 •Page 10 •Page 11 •Page 12 •Page 13 •Page 14 •Page 15 •Page 16 •Page 17 •Page 18 •Page 19 •Page 20 ♦Endnotes »Next page
You are here •Page 7 •Page 8 •Page 9 •Page 10 •Page 11 •Page 12 •Page 13 •Page 14 •Page 15 •Page 16 •Page 17 •Page 18 •Page 19 •Page 20 ♦Endnotes »Next page
33
Glossing
Glosses in manuscripts can be found in three places— the margins, interlines, or gathered together at the end of a section. There are lexical glosses which help readers determine meanings of difficult words, and there are suppletive glosses that helped distinguish what words were referring to. If the gloss was small, the scribe could write it in above the main text it related to. As time in the Middle Ages passed, glossing grew forcing scribes to create new types of page layouts. Biblical studies was a major force for innovation in page layouts. Sometimes a leaf would containing more lines of biblical commentary on it than the lines from the Bible it was discussing. Scribes had to get creative and think up new ways to line the leafs.
|
The glossing on this leaf has been neatly written in the margins around the main text.
|
The page layout on this leaf has changed to three columns in place of the standard two.
|

The Creation of Medieval Manuscripts: From Binding to Writing Support
emiller0718
«Previous page
•Page 1
•Page 2
•Page 3
•Page 4
•Page 5
•Page 6
•Page 7
You are here •Page 8 •Page 9 •Page 10 •Page 11 •Page 12 •Page 13 •Page 14 •Page 15 •Page 16 •Page 17 •Page 18 •Page 19 •Page 20 ♦Endnotes »Next page
You are here •Page 8 •Page 9 •Page 10 •Page 11 •Page 12 •Page 13 •Page 14 •Page 15 •Page 16 •Page 17 •Page 18 •Page 19 •Page 20 ♦Endnotes »Next page
32
Decorations
We can tell by looking at medieval leaves that being a scribe didn’t equal being a good artist. So if a manuscript required illustrations, it would have to be sent off to a skilled artist after it was completely copied out. This artist was then charged with adding the proper additions to the text. The scribe copying the manuscript would leave little notes in the margin for the artist. This way the artist knew exactly what was to go were in the manuscript. In some manuscripts, like those below, these notes are still visible.
|
Though hard to make out, if you look closely inside the small decorated initials you can still see the faint letter markings left by the scribe
|

The Creation of Medieval Manuscripts: From Binding to Writing Support
emiller0718
«Previous page
•Page 1
•Page 2
•Page 3
•Page 4
•Page 5
•Page 6
•Page 7
•Page 8
You are here •Page 9 •Page 10 •Page 11 •Page 12 •Page 13 •Page 14 •Page 15 •Page 16 •Page 17 •Page 18 •Page 19 •Page 20 ♦Endnotes »Next page
You are here •Page 9 •Page 10 •Page 11 •Page 12 •Page 13 •Page 14 •Page 15 •Page 16 •Page 17 •Page 18 •Page 19 •Page 20 ♦Endnotes »Next page
31
Decorations
|
|
In most cases if a decoration was planned, the scribe coping the text would leave room on the leaf for the skilled artist to add it in later. Just like with corrections of the text where it is crammed tightly into lines, if not enough space was left a decoration looks crammed into the space. However, we cannot know if it was just a scribe forgetting to leave enough or an unplanned decoration. There are always hints such as finding a small scribal note or if the decoration doesn’t match the date of the manuscript, but it isn’t easy to know for certain.
On this leaf, the ruling lines made by the scribe so that he didn't take up too much of the page are still visible. This is a big clue that these scenes were apart of the original intent when making this manuscript. |

|
|
This image in contrast to those above is noticeable less polished. If we look closely at the space between the three knights heads and the bottom of the text, it is easy to see that the image has been butted up right next to the text. While this is not a reason to answer definitely that this image was unplanned, it does suggest it.
|

The Creation of Medieval Manuscripts: From Binding to Writing Support
emiller0718
«Previous page
•Page 1
•Page 2
•Page 3
•Page 4
•Page 5
•Page 6
•Page 7
•Page 8
•Page 9
You are here •Page 10 •Page 11 •Page 12 •Page 13 •Page 14 •Page 15 •Page 16 •Page 17 •Page 18 •Page 19 •Page 20 ♦Endnotes »Next page
You are here •Page 10 •Page 11 •Page 12 •Page 13 •Page 14 •Page 15 •Page 16 •Page 17 •Page 18 •Page 19 •Page 20 ♦Endnotes »Next page
30
Decorations
|
|
Decorated initials in manuscripts denote a new section in the text. “The more important the division and the higher the status of the manuscript, the larger and more elaborate the initials would be” (Graham and Clemens 25). Decorated initials range from simply being in color to having ornate flourish and even to being grandiose with pictures inside the letter.
This decorated initial on the left has been colored in finely and vines added around it instead of pen flourishes. Initials, like one on the right, that include a picture inside of it are called historiated initials. |
|

|
|
Common in the Gothic period, red and blue would be used in an alternating pattern to decorate letters as seen on the leaf to the right. In some cases says Graham and Clemens, " a red initial with blue pen flourishes would follow a blue initial with red flourishes" (27). This is not the case with this leaf because both the P and D have both color of flourishes.
The leaf to the left is an example of how simple decorated initials could be left with just a few flourishes of the pen. |
|
The Creation of Medieval Manuscripts: From Binding to Writing Support
emiller0718
«Previous page
•Page 1
•Page 2
•Page 3
•Page 4
•Page 5
•Page 6
•Page 7
•Page 8
•Page 9
•Page 10
You are here •Page 11 •Page 12 •Page 13 •Page 14 •Page 15 •Page 16 •Page 17 •Page 18 •Page 19 •Page 20 ♦Endnotes »Next page
You are here •Page 11 •Page 12 •Page 13 •Page 14 •Page 15 •Page 16 •Page 17 •Page 18 •Page 19 •Page 20 ♦Endnotes »Next page
29
Decorations
|
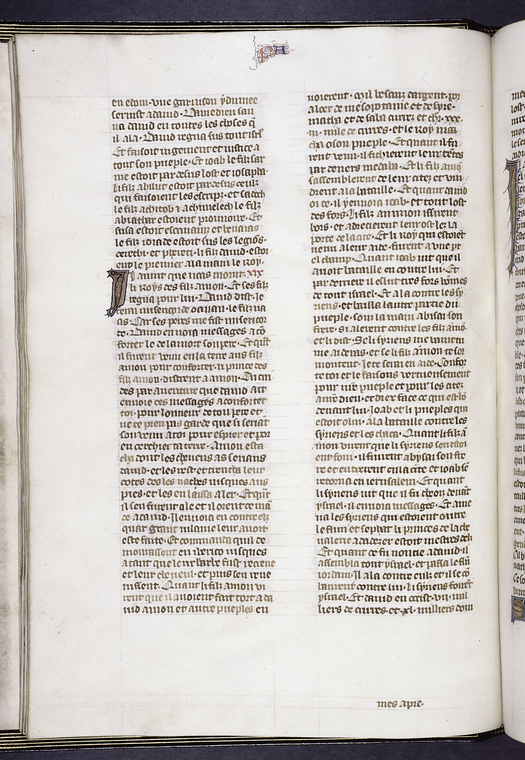
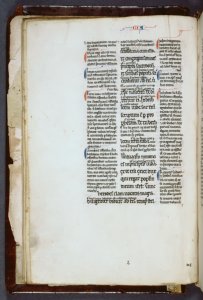
Rubrication is the term used for headings in manuscripts that have been marked in red. A rubricated title or section heading makes it easier for a reader to find the different section breaks in a manuscript since after all “most manuscripts contain more than one text” (Graham and Clemens 24). In theory scribes were meant to leave room when copying out a text for the rubricator, the person who adds the red letters, to write in the title. Since this did not always happen, titles in red can be seen sometimes inserted into margins.
|
|
Rubrication is the term used for headings in manuscripts that have been marked in red. A rubricated title or section heading makes it easier for a reader to find the different section breaks in a manuscript since after all “most manuscripts contain more than one text” (Graham and Clemens 24). In theory scribes were meant to leave room when copying out a text for the rubricator, the person who adds the red letters, to write in the title. Since this did not always happen, titles in red can be seen sometimes inserted into margins.
|
The Creation of Medieval Manuscripts: From Binding to Writing Support
emiller0718
«Previous page
•Page 1
•Page 2
•Page 3
•Page 4
•Page 5
•Page 6
•Page 7
•Page 8
•Page 9
•Page 10
•Page 11
You are here •Page 12 •Page 13 •Page 14 •Page 15 •Page 16 •Page 17 •Page 18 •Page 19 •Page 20 ♦Endnotes »Next page
You are here •Page 12 •Page 13 •Page 14 •Page 15 •Page 16 •Page 17 •Page 18 •Page 19 •Page 20 ♦Endnotes »Next page
132
Writing
Most scribes were not writing down what ever came into their head. They were instead making copies of already completed manuscripts. They need an exemplar to copy from. If the scribe did not have a copy of the text they were wanting to reproduce, then they might try to borrow it for awhile from someone who did have a copy. Later, when universities were flourishing, the exemplar system become very complex. So as not to lose the original texts, universities would make a copy of it. This new copy is called the stationer’s exemplar. From that a set of unbound pecia, or parts, would be made and lent out to student’s to copy from. Even if a manuscript was an original piece, it would most likely have been written up on a wax tablet.
The time it took to copy out a text was dependent on a number of things. A shorter text would obviously take less time to copy than a longer text, but length isn’t the only factor. The amount of time a scribe had to work on copying also can vary the time needed. Graham and Clemens say for monastic scribes, “the daily round of services and other duties meant that…[they] were probably able to devote no more than six hours a day… a good rate of production…would probably have been between 150 and 200 lines of text a day” (22-23). Another important factor to consider is the number of scribes working on making the copy. Two or three scribes can finish a text much faster than one.
The time it took to copy out a text was dependent on a number of things. A shorter text would obviously take less time to copy than a longer text, but length isn’t the only factor. The amount of time a scribe had to work on copying also can vary the time needed. Graham and Clemens say for monastic scribes, “the daily round of services and other duties meant that…[they] were probably able to devote no more than six hours a day… a good rate of production…would probably have been between 150 and 200 lines of text a day” (22-23). Another important factor to consider is the number of scribes working on making the copy. Two or three scribes can finish a text much faster than one.
|
In this image a monk and a man are presenting a book to a knight.
|

The Creation of Medieval Manuscripts: From Binding to Writing Support
emiller0718
«Previous page
•Page 1
•Page 2
•Page 3
•Page 4
•Page 5
•Page 6
•Page 7
•Page 8
•Page 9
•Page 10
•Page 11
•Page 12
You are here •Page 13 •Page 14 •Page 15 •Page 16 •Page 17 •Page 18 •Page 19 •Page 20 ♦Endnotes »Next page
You are here •Page 13 •Page 14 •Page 15 •Page 16 •Page 17 •Page 18 •Page 19 •Page 20 ♦Endnotes »Next page
131
Tools of the Scribe
|
The ink on this leaf has faded to brown.
|
Before a scribe could copy out a text from an exemplar, they needed some basic tools. One of the most obvious being ink, but they couldn’t just run to the local Walmart and buy a bottle of ink. They had to make it.
Inks used on parchment couldn’t be just any type of ink. A special mixture was needed so that it would sink into the parchment. This type of ink could be made from oak galls, a type of wasp egg. “The oak galls contain tannic and gallic acids…” says Graham and Clemens on page 19. Black ink was made by mixing the acid with metallic salts. Black ink fades over time and exposure. That is why the ink on manuscripts today hardly looks consistent in color. In many, the ink has faded to many shades of brown. Once a scribe had made ink, they would also need and ink pot or inkwell to store it in. Ink pots could be used by traveling scribes to make the ink more portable. |

The Creation of Medieval Manuscripts: From Binding to Writing Support
emiller0718
«Previous page
•Page 1
•Page 2
•Page 3
•Page 4
•Page 5
•Page 6
•Page 7
•Page 8
•Page 9
•Page 10
•Page 11
•Page 12
•Page 13
You are here •Page 14 •Page 15 •Page 16 •Page 17 •Page 18 •Page 19 •Page 20 ♦Endnotes »Next page
You are here •Page 14 •Page 15 •Page 16 •Page 17 •Page 18 •Page 19 •Page 20 ♦Endnotes »Next page
130
Tools of the Scribe
|
|
Scribes needed writing tools just as much as they needed ink if they were going to make a manuscript. Most scribes used quill pens made from bird feathers. The feathers would be plucked from geese and then was cut with a penknife to have a tapered point for writing.
The penknife was a knife used by scribes like a pencil sharpener is today. When the quill pen’s tip would become unusable, the penknife was there to cut it back into a smooth point. It also doubled as a way to erase errors in the writing. A scribe could use it to scrap a mistake off the leaf. The leaf pictured on the right has a smudge in it about half way down the text. This smudge is from a pen knife being used to erase a mistake. The final tool a scribe need was a surface to write on. A scribe could use a lap board or a desk that they could lean upon as the wrote. |
The Creation of Medieval Manuscripts: From Binding to Writing Support
emiller0718
«Previous page
•Page 1
•Page 2
•Page 3
•Page 4
•Page 5
•Page 6
•Page 7
•Page 8
•Page 9
•Page 10
•Page 11
•Page 12
•Page 13
•Page 14
You are here •Page 15 •Page 16 •Page 17 •Page 18 •Page 19 •Page 20 ♦Endnotes »Next page
You are here •Page 15 •Page 16 •Page 17 •Page 18 •Page 19 •Page 20 ♦Endnotes »Next page
129
Parchment
|
Just like scribes need to craft there own pens and ink, they needed to craft their own parchment too. Parchment, or vellum, is a writing support made from the animal skins prepared in a certain manner to make it suitable to be written on. Some scholars will reserve the term vellum to indicate that a writing support is made specifically of calf skin and parchment to indicate that it is from the skin of a sheep or a goat. It is not easy to distinguishes between the two types, so generally we can refer to writing supports made from animal skin as parchment and further define it as what type if need be. “Recognizing the species from which a sheet of parchment was made is difficult because a characteristic that may at first sight appear to be an indication of the type of skin used can in fact be the result of the method of preparation” (Graham and Clemens 9).
|
A blank leaf of parchment
|

The Creation of Medieval Manuscripts: From Binding to Writing Support
emiller0718
«Previous page
•Page 1
•Page 2
•Page 3
•Page 4
•Page 5
•Page 6
•Page 7
•Page 8
•Page 9
•Page 10
•Page 11
•Page 12
•Page 13
•Page 14
•Page 15
You are here •Page 16 •Page 17 •Page 18 •Page 19 •Page 20 ♦Endnotes »Next page
You are here •Page 16 •Page 17 •Page 18 •Page 19 •Page 20 ♦Endnotes »Next page
128
Parchment
|
A drawing of a sheep on parchment.
|
The first step to start making parchment is to slaughter the chosen animal or animals. The number of sheep or cow hides needed depends greatly on the number and size of sheets of parchment one needs to produce. Next, the skins of the animal s would then be soaked in a lime solution to help get rid of hair and fat on the skin. To help with hair removal, a curved blade was used in a processes called scudding. Parchment makers wanted to remove all the hair possible in this step. Finally, the skins would be washed in water to remove the lime solution and hung to dry on stretcher. A stretcher was used because the skin wanted to shrink up as it dried, but that wouldn’t produce very good parchment. “The structure of the skin began to change [on the stretcher], the fiber network reorganized itself into a thing, highly stressed laminal structure” (Graham and Clemens 10-11). As the skin dried, the parchment maker would have to tighten the frame holding the skin so it was well stretched.
|

The Creation of Medieval Manuscripts: From Binding to Writing Support
emiller0718
«Previous page
•Page 1
•Page 2
•Page 3
•Page 4
•Page 5
•Page 6
•Page 7
•Page 8
•Page 9
•Page 10
•Page 11
•Page 12
•Page 13
•Page 14
•Page 15
•Page 16
You are here •Page 17 •Page 18 •Page 19 •Page 20 ♦Endnotes »Next page
You are here •Page 17 •Page 18 •Page 19 •Page 20 ♦Endnotes »Next page
127
Parchment
|
When the skin was finally dry it was ready to be cut and turned into sheets of parchment. A single animal skin could only produce a few amount a sheets. If the leaf sizes need was smaller, then of course more sheets could be produced than if larger leafs were needed for a manuscript. Conjoined leaves, or bifolium, were made by folding a large sheet in half. Single leaves were cut from what remained of the skin after the bifolium were cut.
|
The ruler shows that this is a larger leaf. A single animal skin would probably only make a few leaves of this size.
|
The Creation of Medieval Manuscripts: From Binding to Writing Support
emiller0718
«Previous page
•Page 1
•Page 2
•Page 3
•Page 4
•Page 5
•Page 6
•Page 7
•Page 8
•Page 9
•Page 10
•Page 11
•Page 12
•Page 13
•Page 14
•Page 15
•Page 16
•Page 17
You are here •Page 18 •Page 19 •Page 20 ♦Endnotes »Next page
You are here •Page 18 •Page 19 •Page 20 ♦Endnotes »Next page
126
Parchment
|
The dark dot on the right column of this is actually a hole that has been written around by the scribe.
|
Parchment making was not a perfect process. Sometimes things would happen during it and leaves would come out with defects such as holes in the middle of leaves or a curved edge. Since parchment making was such an intense process these defect leaves couldn’t be thrown out. They were used and sometimes even repaired before use.
Holes in leaves are sometimes a result of a defect in the animal skin. If an animal had an injury or bug bite before it was killed than this wound would become part of the parchment. Holes from this type of defect are easy to find because they occur only in one place; whereas, if a bug had come through and eaten parts of a finished manuscript, then the hole would span several leaves deep into the text. Curved edges on leaves also could be a result of how the sheets were cut. For example if one side of the sheet was cut using a curved part of the skin such as the shoulders, then the sheet would obviously have the same curved edge. |

The Creation of Medieval Manuscripts: From Binding to Writing Support
emiller0718
«Previous page
•Page 1
•Page 2
•Page 3
•Page 4
•Page 5
•Page 6
•Page 7
•Page 8
•Page 9
•Page 10
•Page 11
•Page 12
•Page 13
•Page 14
•Page 15
•Page 16
•Page 17
•Page 18
You are here •Page 19 •Page 20 ♦Endnotes »Next page
You are here •Page 19 •Page 20 ♦Endnotes »Next page
125
Quires
The basic grouping of sheets of parchment is called a quire. Eight leaves were the normal size of quires. They could be made up of either four bifoliums or a combination of single leaves and bifoliums. Single leaves if used would be folded into the center so that they could be properly bound into the manuscript later. A scribe had to think when he was arranging sheets in a quire. The hair side and the flesh side of a sheet of parchment look different. The flesh side is usually lighter than the hair side of a sheet of parchment. “The normal practice in Western Europe throughout the Middle Ages… was to arrange the sheets so that.. hair side would face hair side or flesh side would face flesh side” (Graham and Clemens 15). This could be down using folding techniques. A scribe would loosely hold a quire together by tying it with a thread that way the leaves wouldn’t get out of order while copying out a manuscript.
The Creation of Medieval Manuscripts: From Binding to Writing Support
emiller0718
«Previous page
•Page 1
•Page 2
•Page 3
•Page 4
•Page 5
•Page 6
•Page 7
•Page 8
•Page 9
•Page 10
•Page 11
•Page 12
•Page 13
•Page 14
•Page 15
•Page 16
•Page 17
•Page 18
•Page 19
You are here •Page 20 ♦Endnotes »Next page
You are here •Page 20 ♦Endnotes »Next page
124
Pricking and Ruling
Before parchment is ready for coping, the final step it undergoes is ruling and pricking. Scribes would first prick the leaf by making evenly spaced holes up and down the sides near the edge. These holes allowed the scribe to then rule the page. Using a straightedge they would rule the page. This give them the lines to write on. Ruling could be done in leadpoint or drypoint. Leadpoint ruling required each leaf to be ruled individually because it was done using color. Drypoint on the other hand was done by pressing into pages with a knife. With drypoint, scribes could rule both sides of a sheet at once as well as multiple pages.
|
Tiny holes on the left edge of this leaf are the prick marks that were not trimmed off during binding.
|
The ruling on this manuscript is still very visible.
|

The Creation of Medieval Manuscripts: From Binding to Writing Support
emiller0718
«Previous page
•Page 1
•Page 2
•Page 3
•Page 4
•Page 5
•Page 6
•Page 7
•Page 8
•Page 9
•Page 10
•Page 11
•Page 12
•Page 13
•Page 14
•Page 15
•Page 16
•Page 17
•Page 18
•Page 19
•Page 20
You are here ♦Endnotes »Next page
You are here ♦Endnotes »Next page
123
Review
A lot of work went into making medieval manuscripts. Scribes labored to not only to copy out the text, but to make even the basic materials they needed. Illustrators and rubricators spent time adding the tiny details to each page. Binders needed specifically cut wood to make the best covers. Clearly producing medical manuscripts was not easy or cheap.
Since this overview of the creation of manuscripts started at the finished product and worked its way back, here is a final list of the steps in order starting at the beginning.
Once a manuscript was finally fully finished it could at last be stored away.
- Slaughter animals
- Wash and soak skins in lime solution
- Remove the hair
- Stretch the skin on a frame and let dry
- Cut sheets of parchment
- Make ink
- Make a pen
- Copy text
- Rubrication
- Decoration
- Correcting
- Glossing
- Check leaves and quire orders
- Sew together
- Add a cover
Once a manuscript was finally fully finished it could at last be stored away.
|
A finished manuscript bound to be portable.
|
